Why E-Verify Best Practices Are Critical for HR Success
E-Verify best practices can save your business thousands of dollars in fines and protect you from costly compliance headaches. With over one million employers now using E-Verify and an average of 1,500 new businesses signing up weekly, getting this right isn’t optional anymore.
Quick E-Verify Best Practices Checklist:
- Complete Form I-9 first – Never create an E-Verify case before finishing the I-9
- Follow the 3-day rule – Create cases within 3 business days of hire
- Display required posters – Show E-Verify participation and Right to Work notices
- Handle TNCs properly – Give employees the Further Action Notice and 10 days to resolve
- Close all cases – Never leave cases open after receiving final results
- Secure employee data – Protect PII and discuss results privately
- Train your team – Ensure program administrators and users complete tutorials
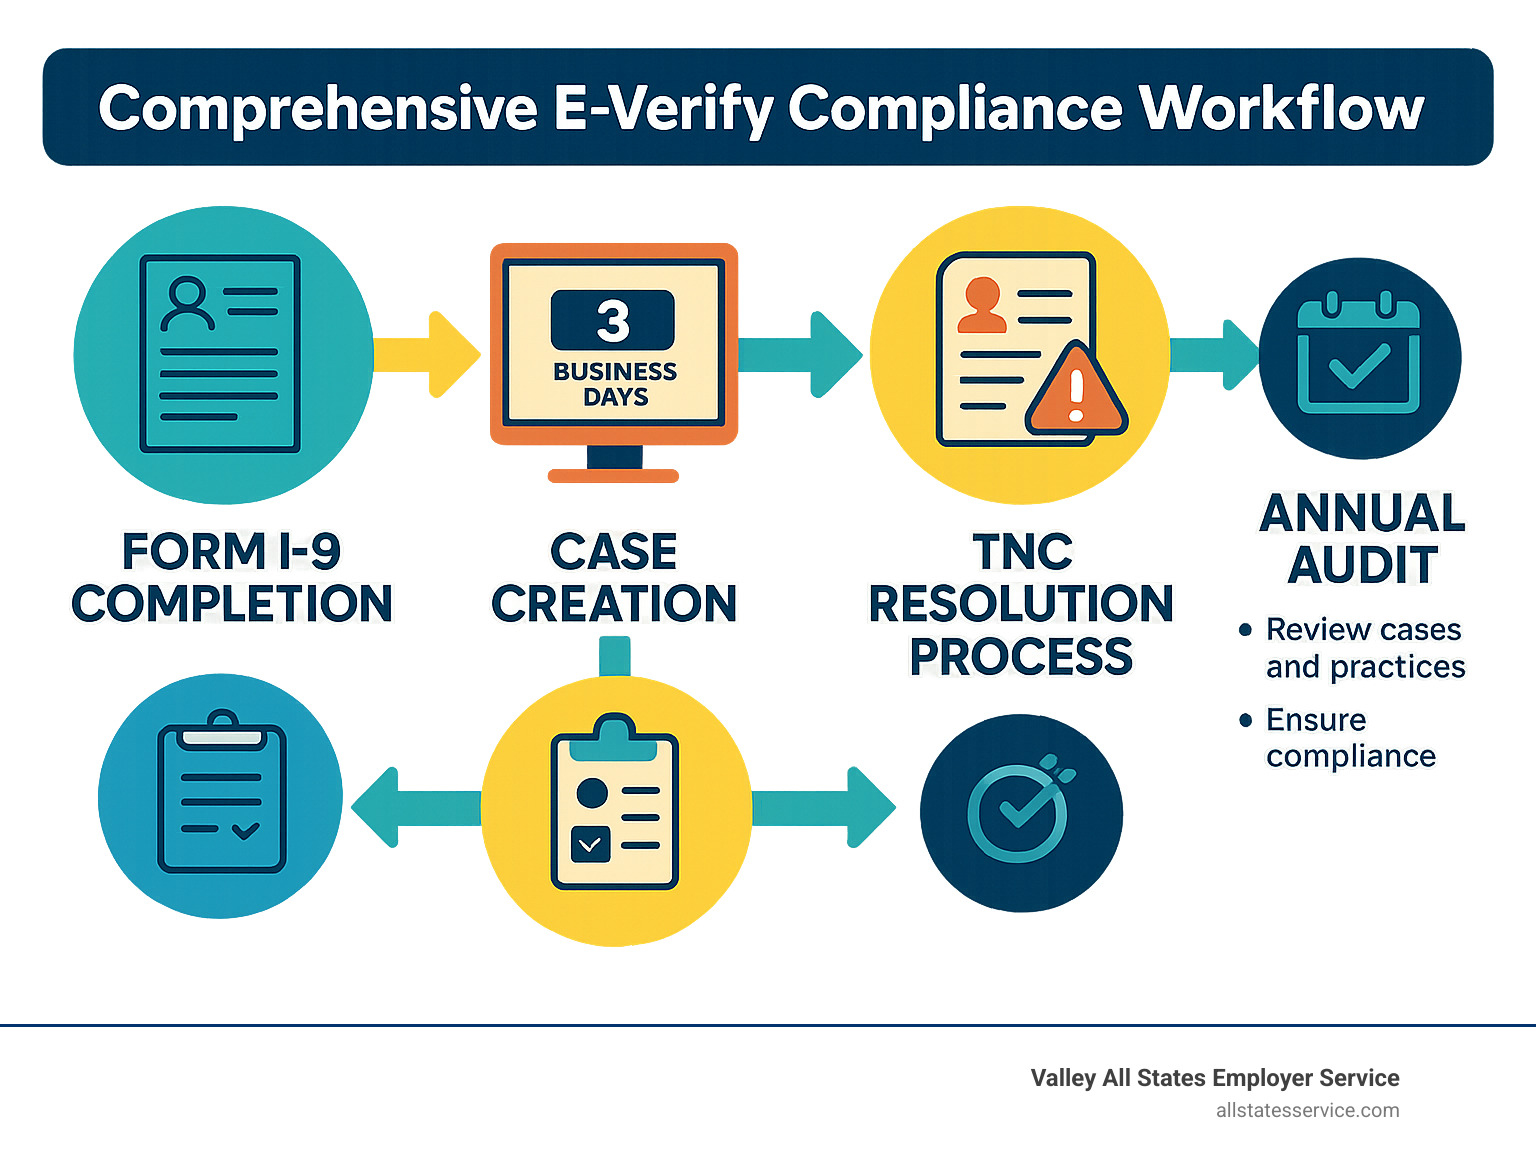
- Audit regularly – Review your process at least annually
The stakes are high. Failing to comply with I-9 documentation regulations can result in fines of up to $5,500 per ineligible worker. Meanwhile, the cost of onboarding a new employee can reach $3,000, but proper E-Verify processes help reduce time, labor, and overall hiring costs.
E-Verify isn’t just about avoiding penalties. It’s about building a systematic approach that protects your business while streamlining your hiring process. Whether you’re a federal contractor who must use E-Verify or a private employer in one of the 22 states with specific mandates, having the right practices in place makes all the difference.
Why E-Verify Matters in 2025: Federal & State Landscape
The E-Verify landscape has transformed dramatically, creating a complex maze of federal and state requirements that can make even experienced HR professionals scratch their heads. What started as a simple federal contractor requirement has evolved into a patchwork of state mandates that vary wildly depending on where you do business.
Here’s the reality: E-Verify best practices aren’t just about following the rules anymore. They’re about staying ahead of an increasingly complex compliance environment that shows no signs of slowing down.
E-Verify works by comparing your Form I-9 data against authoritative databases from the Department of Homeland Security and Social Security Administration. Most cases get resolved within seconds with an “Employment Authorized” result, making it surprisingly efficient when you know what you’re doing.
But here’s where it gets tricky. The three-day rule for creating cases after hire, recent updates to Temporary Protected Status (TPS) categories, and evolving state mandates mean that what worked last year might not cut it today.
| Requirement Type | Federal Mandate | State Mandate Examples |
|---|---|---|
| Coverage | Federal contractors only | All private employers (AZ, MS) |
| Timing | 3 business days after hire | Same, but state enforcement varies |
| Penalties | Up to $5,500 per violation | State penalties plus federal fines |
| Enforcement | ICE audits | State agencies + federal oversight |
The stakes have never been higher. Understanding whether E-Verify is mandatory in your state isn’t just helpful, it’s essential for avoiding penalties that can reach $5,500 per ineligible worker.
Who Must Use E-Verify Today
Federal contractors remain the biggest group required to use E-Verify, but they’re no longer alone. The Federal Acquisition Regulation (FAR) clause means if you have any federal contract work, you’re in the E-Verify club whether you like it or not.
State mandates have exploded across the country. Twenty-two states now have specific E-Verify requirements that go beyond federal rules. Arizona and Mississippi require all private employers to use E-Verify, regardless of their contract status. Meanwhile, states like Utah, Nebraska, Missouri, and Rhode Island focus their requirements on government contractors.
Enrollment thresholds vary by state, creating a compliance puzzle for multi-state employers. Some states kick in requirements when you hit certain employee counts, while others apply from day one of operations.
What Happens If You Don’t Comply
Non-compliance isn’t just about paying fines and moving on. The consequences can fundamentally disrupt your business operations in ways that many employers don’t anticipate.
ICE audits have become more sophisticated and thorough. When they show up, they’re not just checking a few random files. They’re conducting comprehensive reviews that can span years of hiring records.
Civil penalties start at hefty amounts and escalate quickly. That $5,500 per ineligible worker fine is just the beginning. Repeat violations trigger higher penalties, and discriminatory practices during the E-Verify process can add additional federal penalties on top.
Contract loss hits federal contractors especially hard. Losing your ability to bid on government work doesn’t just affect current revenue, it can permanently alter your business model.
That’s why comprehensive employer HR compliance isn’t just about avoiding penalties. It’s about protecting the foundation of your business operations.
E-Verify Best Practices: The 8-Step Compliance Playbook
Getting E-Verify best practices right isn’t just about following rules, it’s about creating a smooth, reliable system that protects your business while making hiring easier. Think of it like following a recipe: skip a step or change the order, and you might end up with a mess instead of the perfect result.
The beauty of E-Verify lies in its simplicity when done correctly. Most cases get resolved within seconds, giving you immediate peace of mind about your new hires. But those quick results only happen when you follow the proper sequence and timing.
E-Verify Best Practices Step-by-Step
Step 1: Always Complete Form I-9 First
This might seem obvious, but it’s the mistake we see most often. You cannot create an E-Verify case before completing Form I-9. The I-9 provides all the essential data for your E-Verify case, and jumping ahead creates errors that can snowball into compliance nightmares.
Step 2: Stick to the 3-Day Rule
You have exactly three business days after an employee starts work for pay to create their E-Verify case. Not three calendar days, not when you remember to do it, but three business days. This deadline is firm, and missing it puts you out of compliance immediately.
Step 3: Post Required Notices Where Everyone Can See Them
Display both the E-Verify Participation poster and the Right to Work poster in English and Spanish. These need to be visible to all employees, whether you post them physically on a bulletin board or display them digitally on your company intranet.
Step 4: Handle Photo Matching Carefully
When employees show you documents with photos like passports, permanent resident cards, or employment authorization documents, you must verify the photo matches the person standing in front of you. Make clear copies of both sides of these documents and store them securely.
Step 5: Include Employee Email Addresses When Available
If your employee provides an email address on their I-9, enter it in the E-Verify system. This simple step enables direct communication about case status and helps resolve any issues faster.
Step 6: Manage Tentative Nonconfirmations (TNCs) Properly
When you receive a TNC, don’t panic. Immediately give the employee their Further Action Notice and explain the next steps privately. They have 10 federal government working days to resolve the issue, and you cannot take any adverse action during this period.
Step 7: Close Every Case Completely
Every E-Verify case must be properly closed after you receive the final result. Use the correct case closure statements and document the outcome appropriately. Leaving cases open is a red flag during audits.
Step 8: Protect Employee Information
Safeguard all personally identifiable information and maintain proper documentation. Store records securely and ensure only authorized personnel have access. This isn’t just good practice, it’s required by law.
For detailed guidance on the complete process, check out the E-Verify Quick Reference Guide for Employers. If managing all these steps feels overwhelming, consider our E-Verify Services to handle the complexity for you.
Training & User Roles for E-Verify Best Practices
Training your team properly is like giving them the right tools for the job. Without proper training, even well-intentioned employees can make costly mistakes that put your business at risk.
E-Verify requires specific user roles with different responsibilities. Your Program Administrator serves as the main contact and oversees the entire process. They must complete the online E-Verify tutorial before creating any cases, add and manage user accounts, and monitor compliance across all users.
General Users handle the day-to-day case creation and management. They also need to complete required training before accessing the system, follow all established procedures and timelines, and protect their login credentials carefully.
The key to successful training is making it ongoing, not just a one-time event. Conduct annual training reviews to keep your team current on best practices and regulatory changes. Document all training completion for audit purposes, and create internal procedures that supplement the official guidance.
Sharing login credentials is absolutely forbidden. Each person who uses E-Verify must have their own account and complete their own training. This protects both your business and your employees from potential compliance issues.
Handling Complexities: Remote Hire, TNCs, and System Outages
Modern hiring brings unique challenges that test even the most experienced HR teams. Remote employees, system glitches, and tricky verification cases can throw a wrench in your E-Verify best practices, but with the right approach, you can handle these situations smoothly while staying compliant.
The reality is that E-Verify isn’t always straightforward. Sometimes the system goes down during peak hiring season. Other times, you’ll get a mismatch that seems wrong. And with more companies hiring remotely, the traditional in-person I-9 process has had to evolve.

Remote Document Verification Checklist
The alternative procedure for remote I-9 verification has been a game-changer for employers, but it comes with specific rules that you absolutely must follow. Think of it as a more flexible version of the traditional process, but one that requires extra attention to detail.
You can only use this procedure if you’re already enrolled in E-Verify and in good standing. This isn’t an option for employers who haven’t committed to the system yet. Additionally, every single hiring site must be enrolled in E-Verify, no exceptions.
Here’s how to implement remote verification correctly. First, standardize your video platform and stick with it. Whether you choose Zoom, Microsoft Teams, or another platform, consistency helps maintain your audit trail and keeps your process clean. Next, create a secure document upload process that protects employee information while giving you clear copies to review.
The actual verification happens in real-time during a live video call with the employee. This isn’t a quick phone chat. You need to carefully examine the documents on screen, just as you would in person. Make sure to check the alternative procedure box on Form I-9 to document that you used this method.
Your audit trail becomes even more important with remote verification. Document every step, maintain clear electronic copies of all documents (front and back), and ensure only authorized personnel conduct these verifications. The goal is to create a paper trail that’s just as robust as your in-person process.
E-Verify Best Practices for Tentative & Final Nonconfirmations
Handling mismatches correctly separates compliant employers from those who end up in legal trouble. When you receive a Tentative Nonconfirmation (TNC), your response needs to be immediate and careful.
Provide the Further Action Notice to the employee right away, but do this privately. Never discuss TNCs in front of other employees or make a big deal about it. The employee gets to decide whether they want to contest the mismatch, and you cannot pressure them either way.
The 10-day window is sacred. Give employees the full 10 federal government working days to resolve the issue, and never take adverse action during this period. That means no terminations, no reduced hours, and no treating the employee differently. Continue checking E-Verify for updates rather than asking the employee for additional documentation.
Final Nonconfirmations (FNCs) require a different approach. If you receive an FNC and believe it’s wrong, contact E-Verify Customer Support immediately. Recent system issues have shown that technical errors can cause incorrect FNCs. For example, cases created between March 23-26, 2025, for employees with I-551 or I-766 documents incorrectly received DHS mismatches.
When these technical issues occur, follow official E-Verify guidance exactly. Close and resubmit cases as instructed, wait for confirmed “Employment Authorized” results before taking any action, and be patient with customer support during high-volume periods. Document all communications and actions you take.
System outages happen, usually at the worst possible times. During government shutdowns or technical difficulties, you can’t create E-Verify cases, but you still need to complete Form I-9 within the normal timeframes. Create your cases as soon as the system comes back online, and don’t take adverse action against employees while you’re waiting.
The key to handling these complex situations is having clear procedures in place before you need them. Whether you’re dealing with remote employees, system errors, or confusing case results, I-9 Verification Assistance can help you steer these challenges while maintaining compliance.
Tech, Record-Keeping & Audit Readiness
Technology and proper record-keeping form the backbone of effective E-Verify compliance. Modern solutions can automate many compliance tasks while ensuring you’re always audit-ready.
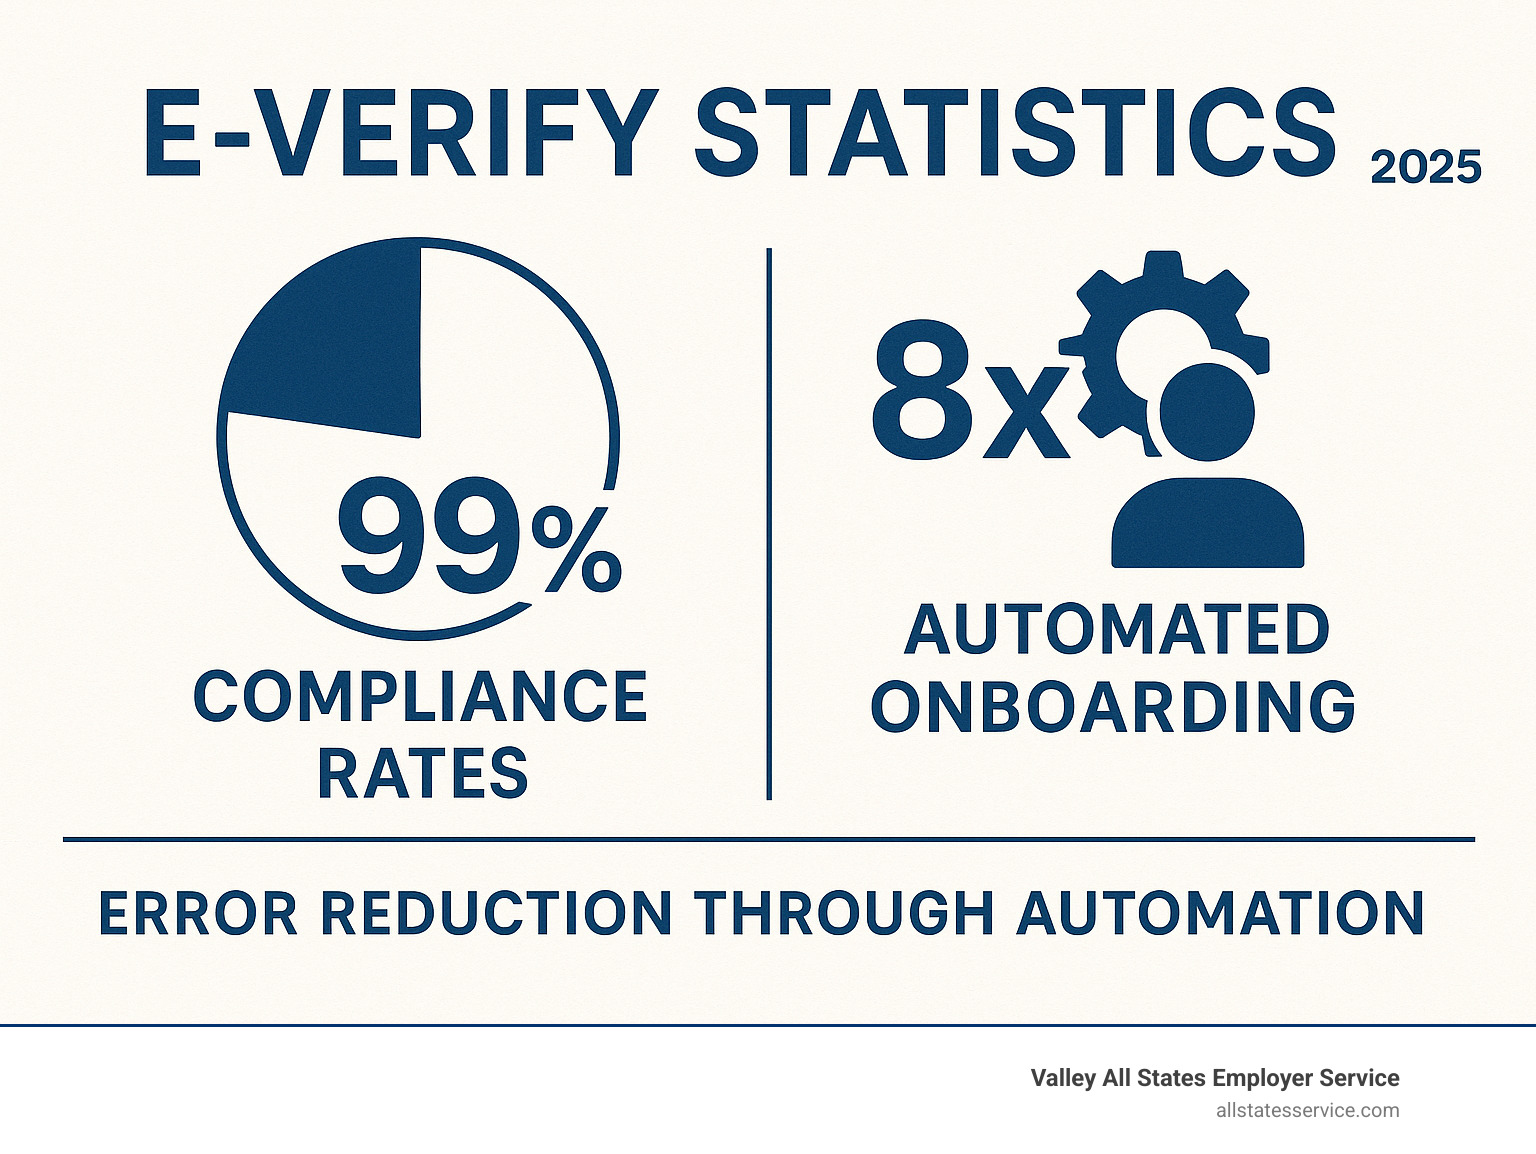
The right technology stack can transform your E-Verify process from a compliance headache into a streamlined operation. We’ve seen employers reduce their processing time by 75% and eliminate most common errors simply by implementing the right systems.
Think of technology as your compliance safety net. While manual processes rely on human memory and attention to detail, automated systems never forget deadlines and always follow the same procedures. This consistency is exactly what auditors look for when they review your compliance program.
Leveraging Automation to Enforce E-Verify Best Practices
Smart automation doesn’t replace human judgment, but it does eliminate the tedious tasks that often lead to compliance errors. Automated case creation based on hire dates ensures you never miss the critical three-day deadline. Your system can track when each employee starts work and automatically remind you when it’s time to create their E-Verify case.
Integration with your existing HR systems creates a seamless flow of information. When you complete an I-9 form in your HRIS platform, the data automatically populates your E-Verify case. This eliminates transcription errors and speeds up the entire process.
Error reduction happens naturally when systems validate data before submission. Digital I-9 forms can check for missing information, invalid dates, or inconsistent entries before you even create the E-Verify case. This front-end validation prevents most common mistakes that cause delays or compliance issues.
Queue management during system outages keeps your workflow moving even when E-Verify experiences technical difficulties. Your system can hold cases during outages and automatically submit them when service resumes, ensuring you maintain compliance even during disruptions.
For larger organizations, API integrations and web services provide enterprise-level capabilities. You can process cases in bulk, monitor status changes in real-time, and generate compliance reports automatically.
Protecting Privacy & Data Security
E-Verify processing involves some of the most sensitive employee information your company handles. Protecting personally identifiable information (PII) isn’t just good practice, it’s a legal requirement that can expose you to significant liability if handled incorrectly.
Data encryption during storage and transmission protects employee information from unauthorized access. Modern cloud-based systems encrypt data both at rest and in transit, ensuring that even if someone intercepts the information, they can’t read it without proper authorization.
Access controls ensure that only authorized personnel can view or modify E-Verify information. Role-based permissions let you give different team members appropriate access levels. Your HR coordinator might be able to create cases, while only your HR manager can access historical records or compliance reports.
Secure storage requirements go beyond just protecting current cases. You need systems that maintain I-9 and E-Verify documentation for the required retention periods while keeping them secure from unauthorized access.
Privacy protocols require that you discuss E-Verify results privately with employees. Never share case information with unauthorized personnel, and always handle sensitive conversations away from other staff members.
Audit trails document every action taken in your system. Who accessed what information, when they accessed it, and what changes they made. This documentation becomes crucial during compliance audits and helps demonstrate that you’re following proper procedures.
The investment in proper technology and security measures pays dividends when audit time comes. Employers with robust systems and clear documentation typically complete audits faster and with fewer compliance issues than those relying on manual processes.
Frequently Asked Questions about E-Verify Best Practices
Getting E-Verify best practices right often comes down to understanding the details that trip up most employers. These are the questions we hear most often from businesses trying to steer the system without making costly mistakes.
What is the deadline to create an E-Verify case?
The three-day rule is absolutely non-negotiable. You must create an E-Verify case no later than the third business day after an employee starts work for pay. Notice we said “starts work for pay,” not when they sign paperwork or complete orientation.
Here’s what catches many employers off guard: this deadline applies regardless of when you finish Form I-9. Even if you’re still working through I-9 completion, that E-Verify case clock is already ticking from the employee’s first day of paid work.
The only time this rule gets suspended is during government shutdowns, but you should never count on that happening. Build your systems around meeting the normal deadline every time. We’ve seen too many employers get caught assuming they had more time than they actually did.
How should employers handle remote hires under the new alternative procedure?
The alternative procedure has been a game-changer for remote hiring, but it’s not a free-for-all. You need to be enrolled in E-Verify and in good standing before you can even think about using this option.
First, make sure all your hiring sites are enrolled in the system. This is a requirement that catches some multi-location employers by surprise. You can’t use the alternative procedure if any of your hiring locations aren’t properly enrolled.
The process itself requires careful attention to detail. You’ll examine electronic copies of employee documents before scheduling a live video call with the employee. During that video call, you’ll re-verify the documents using a standardized platform like Zoom or Microsoft Teams.
Don’t forget to check the alternative procedure box on Form I-9. This small step is crucial for compliance and audit purposes. You’ll also need to maintain clear electronic copies of all documents, front and back, along with a complete audit trail of your verification process.
The timing rules don’t change just because you’re working remotely. You still have that same three-day window to create your E-Verify case after the employee starts work.
What are the record-keeping requirements for E-Verify documents?
Record-keeping for E-Verify goes beyond just storing documents somewhere safe. You need a system that can quickly produce everything an auditor might want to see.
Case documentation forms the foundation of your record-keeping system. Every E-Verify case needs its own file with the case number, creation date, and final result clearly documented. We recommend attaching these case numbers directly to the corresponding I-9 forms so you can easily match them up later.
Tentative Nonconfirmation cases require extra attention. You’ll need to keep copies of the Further Action Notices you provided to employees, along with documentation of how and when employees responded. This creates a clear timeline that shows you followed proper procedures.
Your audit trail should tell the complete story of each case. Who accessed the system? When were cases created? What actions were taken? This level of detail might seem excessive, but it’s exactly what you’ll need if you face an audit or investigation.
Secure storage isn’t just about locking filing cabinets anymore. With electronic records and cloud storage, you need systems that protect personally identifiable information while keeping everything accessible to authorized personnel. Consider using password-protected systems with access controls that limit who can view sensitive employee data.
The key is being able to demonstrate compliance quickly and completely. When an auditor asks about your E-Verify best practices, you want to show them a well-organized system that proves you’ve been following proper procedures all along.
Conclusion & Next Steps
Getting your E-Verify best practices right doesn’t have to keep you up at night. Think of it like learning to ride a bike – once you’ve got the system down, it becomes second nature.
The truth is, most employers who struggle with E-Verify compliance aren’t dealing with complicated legal issues. They’re simply missing the systematic approach that turns a confusing process into a smooth operation. When you have clear procedures, proper training, and the right support, E-Verify becomes less of a compliance headache and more of a competitive advantage.
E-Verify best practices work best when they’re built into your everyday hiring workflow. You’re not just checking boxes to avoid penalties – you’re creating a foundation that protects your business and shows candidates you take legal hiring seriously.
At Valley All States Employer Service, we’ve seen what happens when employers try to handle E-Verify compliance on their own. Some succeed, but many find themselves drowning in deadlines, confused by technical glitches, and worried about making costly mistakes. That’s exactly why we created our outsourced E-Verify services.
Our team handles the technical details, stays current on regulatory changes, and processes cases with the kind of accuracy that comes from doing this work every single day. We’re not just processing paperwork – we’re giving you peace of mind so you can focus on what you do best: running your business.
Whether you’re a federal contractor who must use E-Verify or a growing company in one of the 22 states with specific mandates, the compliance landscape isn’t getting simpler. But your approach to handling it can be.

Ready to turn E-Verify compliance into a competitive advantage? Our team at Valley All States Employer Service specializes in taking the complexity out of workforce verification. Visit our E-Verify Services page to see how we can streamline your compliance process, or explore our comprehensive Employee Onboarding Compliance solutions that cover everything from I-9 verification to ongoing audit support.
You didn’t start your business to become an E-Verify expert. Let us handle the compliance details while you focus on growing your team and serving your customers. That’s what partnership looks like.